Showing posts with label Autumn leaves. Show all posts

Scrapbook Page Holder Fall Challenge Entry

Whew! It's been a long day. I have been so busy. Just now getting a chance to post my blog.

I signed up for a challenge in a Facebook group I'm in called, Girls, Giggles, Glitter, and Glue. It can be anything using fall colors but nothing too small. Deadline is September 30.

I have been hoarding a Scrapbook Page Holder I purchased from Michael's a few years ago. Every since I saw a video on YouTube where this lady used it as a calendar stand, I wanted to do one also. It was so gorgeous!

I painted mine in yellows, reds, oranges, browns, and Tim Holtz stains, copper and silver. I painted the leaves and bird in red, orange, and yellow and used Stickles in gold and red on them. I also used red Stickles on the berries. It holds 8"x8" pages. I cut cardstock in different colors to fit the sleeves to coordinate with the months.

After an hour of searching for free calendar printables online in size 6"x6" with no luck, I decided to give up and wait till tomorrow. I might cave and buy the one I saw on Etsy. Definitely will save me a lot of time and a headache.

September is almost over but it's the month I'm starting with being the challenge ends on the 30th.  I'm going to layer and decorate each month in colors and holiday embellishments that coordinates together.

Here's pics of what I've completed so far.

Thanks for reading and Happy Crafting!

XOXOXO


Autumn Is In The Air

Autumn equinox 2016 has arrived, today, September 22. The weather here in the CCC (Triple C- Crescent  City, California) today started out cool but turned out breezy and warm in the afternoon. Gazing around while I sat and chatted with my husband today, I noticed a hint of autumn. The leaves on the trees have started changing with autumn colors. The reds, oranges, yellows and golds are some of my favorite colors. They're so bright and warm. I can't wait until the autumn season peaks and all the trees are alive with their awe inspiring beauty. 

Although we have trees all around us,, we have no trees in the yard with leaves. I love to rake leaves. Some of my fondest memories as a child is of raking leaves for my grandmother. Some saw it as a chore but I looked upon it as having fun. Raked them up, jumped in them, scattered them all about and then just kept doing it over and over. So much fun!

I also enjoy going to the pumpkin patch, hayrides and decorating for Halloween. 

Since I'm reminiscing about days gone by, here's some of my favorite pics.


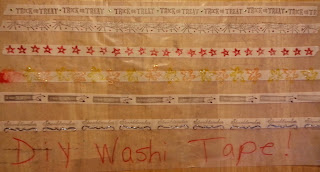
Diy Washi Tape...

My diy crafty project for today is washi tape. You see it everywhere. It can be expensive and sometimes they even carry it at your local Dollar Store.

I wanted to make my own, so I went on YouTube. They have tons of diy washi tape videos of various methods. There's no specific video to reference back my method. I just watched multiple videos and decided to incorporate different ones in mine.

I chose autumn and Halloween as the theme. I made 10 different designs using watercolors, inks, and stamps. I use glitter glue to accent some of the designs. Each one measures approximately 24 inches in length.

You can make your own to use in scrapbooking, card making, decorating, and anything ranging from phone cases to furniture. Washi tape is so versatile and fun to make. You can use tissue paper, scrapbook paper, junk mail, magazines, newspapers,  inks, stamps, and just about anything you have on hand to make and decorate your diy washi tape with.

Below is a list of supplies I used to make mine.

Supplies list:

1. Masking Tape 1 inch
2. Wax Paper
3. Inks ie. Stamping Inks
4. Stamps
5. Watercolor Pen
6. Glitter Glue
7. Heat Gun (aids with faster drying but not necessary)
8. 10 Toilet Paper Rolls (cut to 1 inch in width)


I leave you today with another easy peasy diy project you can make in less than 30 minutes. So I hope you have just as much fun making your washi tape as I did. Throw a diy washi tape party and invite your family and friends.

"At the end of the day all that matters is love and memories so make sure you give it and make sure you make them." Trent Shelton

Tin Can Toothbrush Holders...His and Hers For Autumn!

Today I'm sharing with you a small project I made for the bathroom. Being on a shoestring budget gets the creative juices flowing. I incorporated ordinary household items along with what's in my craft stash in this project.

So, today I'll show you how I made the his and hers toothbrush holders. What makes my different from the others is I use a plastic water bottle inside the tin can. It can be washed or switched out with another one once the bottom gets dirty. 

Supply List: 

1. Tin Cans Any Size
2. Tape or Glue
3. Decorative Paper
4. Embellishments
5. 20 oz Plastic Water or Soda Bottle
6. Scissors or Paper Cutter
7. Ruler or Measuring Tape
8. Markers, Pen, or Something To Write With

Total Time To Make:

Less than 15 minutes.


I know you can go buy a toothbrush holder fairly cheap. Sometimes it's not convenient or in my case just don't have the extra money. On the bright side, I'm recycling and helping the environment. Also, I get to decorate for the season and personalize both at the same time.

Thanks for reading and remember "to squeeze out that creative juice." Whether it's a new idea or a twist on an old idea, just make something! 

XOXOXO. Dawn

Handmade "Graphic 45" Pocket Size Travelers Notebooks Planners

Making and selling these traveler's notebook planners is not what I thought it will be. Hmmm? More time spent in the planning stage than...