Showing posts with label diy projects. Show all posts

Diy Halloween Keyboard and Laptop For Sab's Spooky Space Challenge

Another one of my Sab's Spooky Space challenge decorating ideas was to decorate my laptop for Halloween. I scoured the internet for ideas. I saw washi tape ideas and certain apps you can download on your phone to decorate the keys on the keyboard but nothing that spiked my interest.

So, I decided to go another route. I Googled an image of my keyboard and saved it to my computer. I opened it in Paint and enlarged it to the size of my keyboard. I painted the keys in orange, green, purple and black. I then labeled the keys. All this too approximately three hours to complete.

Then I spent an hour and a half fussy cutting the keys and inking all the edges in black to cover up any imperfections in my cutting. I spent another hour taping the images to the keys.

After which I spent another two or three hours fussy cutting Halloween embellishments, trimming papers, inking edges of the embellishments and papers in black ink. I glitter glued some of the embellishments and taped rhinestones around the mouse area. I also included some owl stickers which I had in my stash.

The embellishments I used are from Design by Dani the Its Scary complete kit which you can find at http://www.snapclicksupply.com/its-scary-complete-kit/. I also used some embellishments from Cute Daisy which you can find at cutedaisy.com. The papers I used can be found at  http://halegrafx.com. The owl stickers are EK Success and the some of the candy corn embellishments are K & Company. I used a couple of googly eyes, Tim Holtz glitter glue and rhinestones.

Finally, I have my laptop all "TRICKED OUT" for Halloween. I just love it. It's really "Halloweenie!" Also, nothing is permanent. It's taped so it will clean up easy after the holidays. Here's the pics.


I hope this project inspires you to craft something if not for the holidays, anything is fine. Crafting is relaxing. Remember to just have fun with it. There's no right or wrong. My letters on my keyboard are not cut to perfection but they're cut to perfection for me and that's all that matters.

So I wish you "Happy Crafting!"

XOXOXO

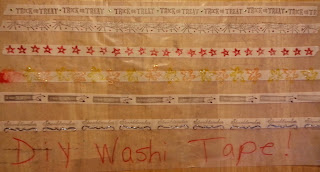
Diy Washi Tape...

My diy crafty project for today is washi tape. You see it everywhere. It can be expensive and sometimes they even carry it at your local Dollar Store.

I wanted to make my own, so I went on YouTube. They have tons of diy washi tape videos of various methods. There's no specific video to reference back my method. I just watched multiple videos and decided to incorporate different ones in mine.

I chose autumn and Halloween as the theme. I made 10 different designs using watercolors, inks, and stamps. I use glitter glue to accent some of the designs. Each one measures approximately 24 inches in length.

You can make your own to use in scrapbooking, card making, decorating, and anything ranging from phone cases to furniture. Washi tape is so versatile and fun to make. You can use tissue paper, scrapbook paper, junk mail, magazines, newspapers,  inks, stamps, and just about anything you have on hand to make and decorate your diy washi tape with.

Below is a list of supplies I used to make mine.

Supplies list:

1. Masking Tape 1 inch
2. Wax Paper
3. Inks ie. Stamping Inks
4. Stamps
5. Watercolor Pen
6. Glitter Glue
7. Heat Gun (aids with faster drying but not necessary)
8. 10 Toilet Paper Rolls (cut to 1 inch in width)


I leave you today with another easy peasy diy project you can make in less than 30 minutes. So I hope you have just as much fun making your washi tape as I did. Throw a diy washi tape party and invite your family and friends.

"At the end of the day all that matters is love and memories so make sure you give it and make sure you make them." Trent Shelton

Handmade "Graphic 45" Pocket Size Travelers Notebooks Planners

Making and selling these traveler's notebook planners is not what I thought it will be. Hmmm? More time spent in the planning stage than...