Showing posts with label Halloween. Show all posts

Halloween DIY Paper Bag Cards...

I'm still going strong working on my Halloween projects. I still got a lot of stuff I want to complete by October 31. Halloween is my favorite holiday and try and go all out every year.

So, I found two packs of Halloween bags from a yard sale for 0.50$ each. The two packs are the same but the 12 bags each have different designs. I knew as soon as spotted them, I was going to make Halloween diy paper bag cards. It's not a new idea but it's something I wanted to do for Halloween. They appear to have come from one of my favorite stores, The Dollar Tree. Yay!!!

They're really easy and inexpensive to make for Halloween which is totally my cup of tea. Most of the papers and embellishments came from online and the rest from my craft stash.

The papers and embellishments I use are "Spookalicious" by Mye De Leon and Design by Dani, "It's Scary Complete Kit". Also, I use printables from cutedaisy.comhalegrafx.com, and printabelle.com.
Along with sequins, glitter glue, black ink, washi tape and my diy washi tape (here's the link http://impossiblecreations.blogspot.com/2016/09/diy-washi-tape.html) to decorate, I use glue, double sided tape and dimensional tape to bind it together.

The inserts in the front pockets are some of the cut outs from the online printables and the designer paper either folded or just a single sheet. I inked the edges. They can be used for photos, journaling or both. I used color pencils on the Frankenstein.

I'm only showing four completed Halloween diy paper bag cards. I'm showing group pic, front and insert of each card, the back of each card and the ones I haven't finished.


Hope this inspires you to make paper bag cards for Halloween, if not maybe for Thanksgiving or Christmas.

Thanks for taking the time to read my blog. Have a blessed day!

XOXOXO Dawn

Eek! My October Calendar Layout...

I just love October and everything that comes along with this time of the year. Today I enjoyed Watching Sandra Lee's Halloween specials old and new episodes. I also purchased (Yay!) a Design by Dani Halloween digital paper collection which is what I use in my October calendar layout.

The paper collection is called "It's Scary"and it's the complete kit. Can be found here, http://www.snapclicksupply.com/its-scary-complete-kit/.  I love it being it's affordable and it includes papers and the embellishments and easy to resize in Microsoft Word.

Along with using the paper from the collection, I also used the embellishments, Tim Holtz glitter glue in Xmas Red, Clear Rock Candy, Gold, and Lime Green. I also inked around the edges of the embellishments with Tim Holtz Black Soot.

Here's some pics.


As I have a Brothers printer, I printed the calendar from the Brother Creative Center which came with the printer because it was just easier for me.

I had fun creating my October calendar layout. Hope you try something new today.

Happy Crafting!

XOXOXO


Mischief and Mayhem! Day 2 of Countdown to Halloween...

Lol! Almost successful in finishing day 2 of countdown to Halloween project but not quite. There's mischief and mayhem abound in our household. I, being grandma, thought it a great idea that we all make bat hands. It's simple and quick. I print, cut out the pieces and all that's left is to glue them together and trace our hands so we can glue them on for the bat wings.

I downloaded a few of the countdown to Halloween activities and found one that's perfect for a 20 month old and a three year old. It's called "handprint bat craft." I found it at http://www.dltk-kids.com/p.asp?p=http://www.dltk-kids.com/animals/phandprintbat.asp. You can either print in color or black and write and comes with printed instructions. I printed the ones in color and cut them out ahead of time. I inked the edges with Tim Holtz Black Soot.

Here's a pic of the bat pieces.


However, that didn't go as smooth as I had envisioned. I put some Halloween music on from the Pandora app to get us in the mood. Had us all sitting at the table but Avah, my granddaughter, had other plans. She kept getting up and trying to take every ones bat pieces and trying to get the glue. Tray, my grandson, kept wanting to mess with the glue.

After a few minutes of trying to round them up, we were able to get Avah's and Tray's bats glued together except the hands. Well, almost, because Tray decided to get up and try and flush his bat feet down the toilet because he said coming out of the bathroom wiping his hands together, "Now, my bat doesn't have any feet, there." So comical but I was a little flustered because I wanted everything to be perfect but that was so unrealistic. I know, I know, I know...

Finally, we round them up again and I was able to help Tray trace his hands and his mama and I got ours done. Avah, not so because by that time Tray didn't want to participate anymore. He took his blue Playdoh and rubbed it on my bat in the glue and Avah just couldn't sit still.

We knew it was time to call a halt to all the activities. But here's the pics of our bats.


Tray's bat with no feet!


Avah's bat with no feet or wings!


Ashley's bat!


My bat with blue playdoh!

 So what came to be, of a perfect envisioned countdown to Halloween project, a not perfect but memorable, one of a kind, family time well spent and I know we'll look back on this and laugh. Life isn't perfect, things don't always go as plan and that's what makes life's moments so wonderful and great.

So today I learn there's no mistakes in crafting, just "Happy Accidents." as Bob Ross calls them.

Happy Crafting!

XOXOXO

October Daily Countdown to Halloween...YouTube Inspired!

Today starts the first day of my October daily and countdown to Halloween. Every year I watch YouTube videos of people doing their October daily and I say, "I wanna make one!" But everytime I say it, well that's all I do, because I never take the time to make one. Well this year is different. I might be running behind but that's not going to stop me from doing it.

I'm using a Graphic 45 black album. I decorated the front cover using Stickles, rhinestones and free printables from online. The paper collection I use is from halegrafx.com. The banner and all the other embellishments except the calendar came from cutedaisy.com.  They're actually for planners but this is also like an album/planner and they're so cute. The calendar came from, I'm sorry I don't remember but I found it by doing a Google search for Halloween advent calendars. The little circle embellishments which I will use to countdown on the cover calendar came from printabelle.com.

Also on cutedaisy.com  they have coordinating printable washi tape and stickers. The printables including the washi tape and stickers comes in either orange, green and purple designs. The stickers will look nice printed on photo paper. Washi tape will look nice printed on either cardstock or photo paper depending on the look you trying to achieve. Here's a pic of some of the printables so you get an idea.


You can find the same printables for Thanksgiving and Christmas and among other holidays also. There's a lot of free printables online but you just have to look for them. I recommend finding them either on Google or Pinterest.

I will be using all online printables for this October daily countdown to Halloween planner/album.

As the month progresses I will be posting the finished projects I've started and new ones I'll be starting. It's going to be a super busy month but I'm very much looking forward to it.

Here's pictures of the front and back covers of my album. I'm not finished by a long shot but once it's all done I'll post and let you see.


Hope it inspires you to make one so you and your family can look back years from down and enjoy all the memories you going to make this October.

Happy Crafting!

XOXOXO

Spooky Halloweenie Bulletin Board For Sab's Spooky Space Challenge on YouTube!

Halloweenie time...well almost. I decorated my bulletin board for Sab's Spooky Space Challenge on YouTube.

The papers and embellishments I used or either free printables from online or Pinterest and from my stash. I want it to be spooky but fun and colorful at the same time.

I might end up switching it up but for right now I'm fine with it. I thought about a tree with a branch sticking out for the owls to sit on, some sayings and I don't know what else.

Anywho, I appreciate you taking the time to check out my blog. Please check back frequently as I am trying very hard to do the 365 blog challenge.

Here's some pics of my Halloween Bulletin board for Sab's Spooky Space Challenge on YouTube.  Also here's the link to the challenge https://youtu.be/r0_1FepTylo and please check out her other videos because she's really a fantastic crafter.


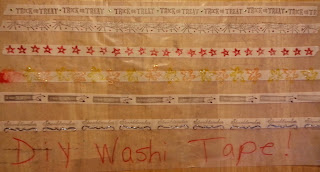
Diy Washi Tape...

My diy crafty project for today is washi tape. You see it everywhere. It can be expensive and sometimes they even carry it at your local Dollar Store.

I wanted to make my own, so I went on YouTube. They have tons of diy washi tape videos of various methods. There's no specific video to reference back my method. I just watched multiple videos and decided to incorporate different ones in mine.

I chose autumn and Halloween as the theme. I made 10 different designs using watercolors, inks, and stamps. I use glitter glue to accent some of the designs. Each one measures approximately 24 inches in length.

You can make your own to use in scrapbooking, card making, decorating, and anything ranging from phone cases to furniture. Washi tape is so versatile and fun to make. You can use tissue paper, scrapbook paper, junk mail, magazines, newspapers,  inks, stamps, and just about anything you have on hand to make and decorate your diy washi tape with.

Below is a list of supplies I used to make mine.

Supplies list:

1. Masking Tape 1 inch
2. Wax Paper
3. Inks ie. Stamping Inks
4. Stamps
5. Watercolor Pen
6. Glitter Glue
7. Heat Gun (aids with faster drying but not necessary)
8. 10 Toilet Paper Rolls (cut to 1 inch in width)


I leave you today with another easy peasy diy project you can make in less than 30 minutes. So I hope you have just as much fun making your washi tape as I did. Throw a diy washi tape party and invite your family and friends.

"At the end of the day all that matters is love and memories so make sure you give it and make sure you make them." Trent Shelton

365 Blogging Challenge...

Happy September! I'm a happy camper, what with autumn just around the corner and all three of my favorite holidays coming up.

But remember, I live in California so we're in a drought and our grass is dead. It's been unseasonably hot this year but here in the Triple C (CCC), it's still not as hot as it is elsewhere in California.

Here's some pics of what September looks like at my house.


Even still, I just love everything about fall. The changing colors of the leaves, the crispness in the air, apple picking, back to school, and that all my favorite holidays are celebrated in the fall.

I'm itching to get my Halloween decorations made and put up. For some reason I'm having a hard time getting started. I'm motivated but maybe just not enough. Hopefully, after listening to some Halloween music on Pandora and watching Halloween videos on YouTube I'll be motivated enough to get started.

So in the coming days I'll blog about each of my projects and post pics so you can see what I'm making this year on a shoestring budget.

Also, as of today, I'm going to start the 365 Blogging Challenge. I'm very motivated and dedicated to complete the challenge. So please check back daily as I will have fresh, interesting and entertaining content for you to read.

So I say, "Goodbye August and Hello September!"


Altered mask for mixed media challenge

4G or Girls, Giggles, Glitter, and Glue on Facebook has a mixed media challenge which I participated. You didn't have to send anything in nor was it a swap. You just had to alter something you purchased from a thrift store or the Goodwill using some of the products listed for the challenge.
I altered a Halloween mask. I put it off so long because of other obligations that the deadline crept up on me before I knew it. I didn't do it until 3 hours prior to the deadline. Whew! I did it though. I didn't win, but I had fun and in the end that's what count.


I used gesso, paint, crackle paint, rhinestones, glitter, glitter glue, flowers, buttons, ribbon, black oil marker, jute, butterfly bow and bling.


Boo! My first ATB (Artist Trading Block) and my first swap.

Bored, I went on Facebook to see what kind of groups I could join. I joined at least 25+ craft groups. After a while I weeded those now to just a few. Realistically I knew there was no way I would participate in all the groups. One group in particular, Girls, Giggles, Glitter and Glue, ultimately persuaded me to participate. Originally I would only watch and comment. I participated in an ATB or Artist Trading Block swap with our choice of any theme. Names were drawn and I had a partner. I, myself, didn't have any particulars for making my ATB but my partner liked, pinks, purples and turquoise, girlie theme.
I've seen the ATBs but never really paid attention to them. After looking on Pinterest, I decided to do my with a Halloween theme. I made the box approximately a 4" cube. Used the papers from an old Halloween Collection, I think maybe it's My Mine's Eye, something, something, something. Dyed the lace with some homemade ink spray I concocted after watching https://www.youtube.com/watch?v=0M3Ac3QGUyI . Attached some ribbon on all corners, hot glued the lace around the edges, screwed in some blue glass knobs for legs inked with black Stazon, Ranger Stickles, rhinestones, silver chain, rhinestone sprays, WOC (Wild Orchid Crafts) flowers, paper bat and some cut-outs all used on the ATB. Once finished, I just hoped my partner would like it. You know when you make something, you're always worried they might not like it but she loved it.:) Anywho, Thanks for taking the time to read and posted below is pics of my project.
If you like you can also watch a short video of the ATB on my YouTube channel at https://www.youtube.com/watch?v=cnGmjQBjhbk . Until next time, Happy Crafting!

Handmade "Graphic 45" Pocket Size Travelers Notebooks Planners

Making and selling these traveler's notebook planners is not what I thought it will be. Hmmm? More time spent in the planning stage than...